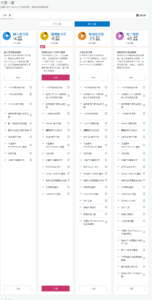
Docker CE 是Community Edition,也就是社群的版本,有2個更新通道,分別是stable和edge。主要是針對新創的小團體。
另一個是Docker EE,也就是Enterprise Edition企業版,主要是針對建置、執行、重要服務,等商業使用。
看了介紹,加上我自己熟Linux,其實我應該要用的是EE版,不過因為是初使用,就先用DOCKER的CE版吧。

如果有舊版,先進行移除
sudo apt-get remove docker docker-engine docker.io
Ubuntu 1604以上的版本,使用下面方式安裝
1.$ sudo apt-get update
2.$ sudo apt-get install \
apt-transport-https \
ca-certificates \
curl \
software-properties-common
3.curl -fsSL https://download.docker.com/linux/ubuntu/gpg | sudo apt-key add –
加入GPG Key
4.$sudo add-apt-repository \
“deb [arch=amd64] https://download.docker.com/linux/ubuntu \
$(lsb_release -cs)\
stable”
安裝stable版
5.sudo apt-get update
6.$ sudo apt-get install docker-ce
測試
sudo docker run hello-world
這時,因為沒有hello-world這個容器,會進行下載
系統自動下載後,會自動執行
會出現下面的訊息,表示安裝完成
Hello from Docker!
This message shows that your installation appears to be working correctly.To generate this message, Docker took the following steps:
1. The Docker client contacted the Docker daemon.
2. The Docker daemon pulled the “hello-world” image from the Docker Hub.
(amd64)
3. The Docker daemon created a new container from that image which runs the
executable that produces the output you are currently reading.
4. The Docker daemon streamed that output to the Docker client, which sent it
to your terminal.To try something more ambitious, you can run an Ubuntu container with:
$ docker run -it ubuntu bashShare images, automate workflows, and more with a free Docker ID:
https://cloud.docker.com/For more examples and ideas, visit:
https://docs.docker.com/engine/userguide/
再來就是hub上找適合的容器來使用
參考文章
https://docs.docker.com/install/
https://docs.docker.com/install/linux/docker-ce/ubuntu/
隨機文章
- ADSL線路租金下降 (2008-03-09)
- 讓 HeiDiSQL 連線 MySQL Server (2020-07-23)
- 公告:本站停止新聞寄送服務 (2012-01-23)
- 一個按鍵擋掉所有網站圖片盜鏈 (2014-11-27)
- eee PC VS. OLPC 比較表 (2007-11-03)


